Struggling with short blade life and unexpected downtime? A simple weekly check can prevent these headaches and save your factory a lot of money.
A weekly inspection should focus on two key areas. First, lubricate all moving parts like bearings and shafts with grease. Second, clean the coolant tank and filters thoroughly. This simple routine can boost your blade life by 5-10%.

I learned this the hard way a few years ago. Now, this check is a non-negotiable part of my week. It is not just about one or two things. It is a full system check that protects the whole machine. Let's break down exactly what you need to look at to keep your operation running smoothly.
What Are the Key Lubrication Points on a Band Saw?
Are your grease guns sitting idle in a toolbox? Not lubricating your saw correctly can cause major friction and wear. This leads to costly breakdowns and ruined blades.
Focus on the critical moving parts. Weekly, you must add grease to the band saw blade guides, saw frame hinge shaft, main and passive wheel bearings, and the main drive worm gear bearings. Use a quality grease for best results.

These lubrication points1 are the joints and muscles of your band saw. Ignoring them is like asking a worker to do a hard job with no water. It just leads to failure. In my early days, I once skipped greasing the main wheel bearings for a few weeks. The machine started making a terrible grinding noise. We had to stop production for half a day to replace a seized bearing. It was an expensive lesson. Now, I understand why each point is so important.
Why Each Lubrication Point Matters
Let's look at each part. When you understand its job, you understand why grease is so critical.
| Lubrication Point | Why It's Important | Recommended Action |
|---|---|---|
| Blade Guides | Keeps the blade straight for accurate cuts and reduces vibration. | Check for smooth operation and apply grease to contact points. |
| Saw Frame Hinge Shaft | Allows the saw frame to move up and down smoothly. | Lubricate to prevent seizing, which causes jerky, unsafe motion. |
| Wheel Bearings (Main/Passive) | Supports the wheels that drive and guide the blade. | Prevents overheating, wear, and catastrophic bearing failure. |
| Drive Worm Gear Bearings | Transfers power from the motor to the blade wheel. | Reduces friction and wear on the core of the drive system. |
A little bit of grease prevents metal-on-metal contact. This contact creates heat and friction. Heat ruins the temper of your blade, and friction wears down expensive parts. A simple weekly application of grease is the cheapest insurance you can buy for your machine.
How Does Cleaning the Coolant System Extend Blade Life?
Is your coolant tank full of metal chips and sludge? This dirty mix grinds away at your blades and clogs your system. This causes overheating and poor cuts.
Cleaning the coolant system is vital. Removing metal chips from the tank and cleaning the filter stops them from being re-circulated. This ensures clean coolant reaches the blade, reducing heat and friction, which directly extends the blade's cutting life.

Think about what coolant does. It cools the blade and lubricates the cut. It also washes away the metal chips, or swarf, that you create. If the coolant is already full of chips, it cannot do its job. Instead of washing chips away, it blasts the blade teeth with an abrasive slurry. This is like cutting with sandy water. It dulls the blade incredibly fast. I've seen blade life cut in half just because of a dirty coolant tank. Taking 15 minutes to clean it is a huge return on investment.
A Step-by-Step Guide to Cleaning Your Coolant System
Here is the simple process we follow every single week.
- Turn off and lock out the machine. Safety first.
- Remove the filter screen or mesh. Clean it thoroughly with a brush.
- Scoop out the thick sludge of metal chips from the bottom of the tank. A small shovel or a custom tool works great.
- Wipe the tank walls clean. This removes any clinging grime.
- Check the coolant level and concentration. Top it off with a properly mixed coolant solution if needed.
This simple cleaning prevents a number of problems that can stop your production line.
| Problem from Dirty Coolant | The Impact on Your Operation | Solution |
|---|---|---|
| Abrasive Chips in Fluid | Wears down blade teeth prematurely, causing slow or crooked cuts. | Weekly chip removal and tank cleaning. |
| Clogged Nozzles or Lines | The blade overheats from lack of coolant, causing it to dull, warp, or break. | Inspect and clean nozzles during tank cleaning. |
| Bacterial Growth | Poor coolant performance, bad smells, and potential skin irritation for operators. | Use a quality coolant with biocides and maintain it properly. |
A clean coolant system means the blade gets a steady flow of clean fluid. This keeps the cut cool, flushes chips away effectively, and lets the blade do its job without extra wear.
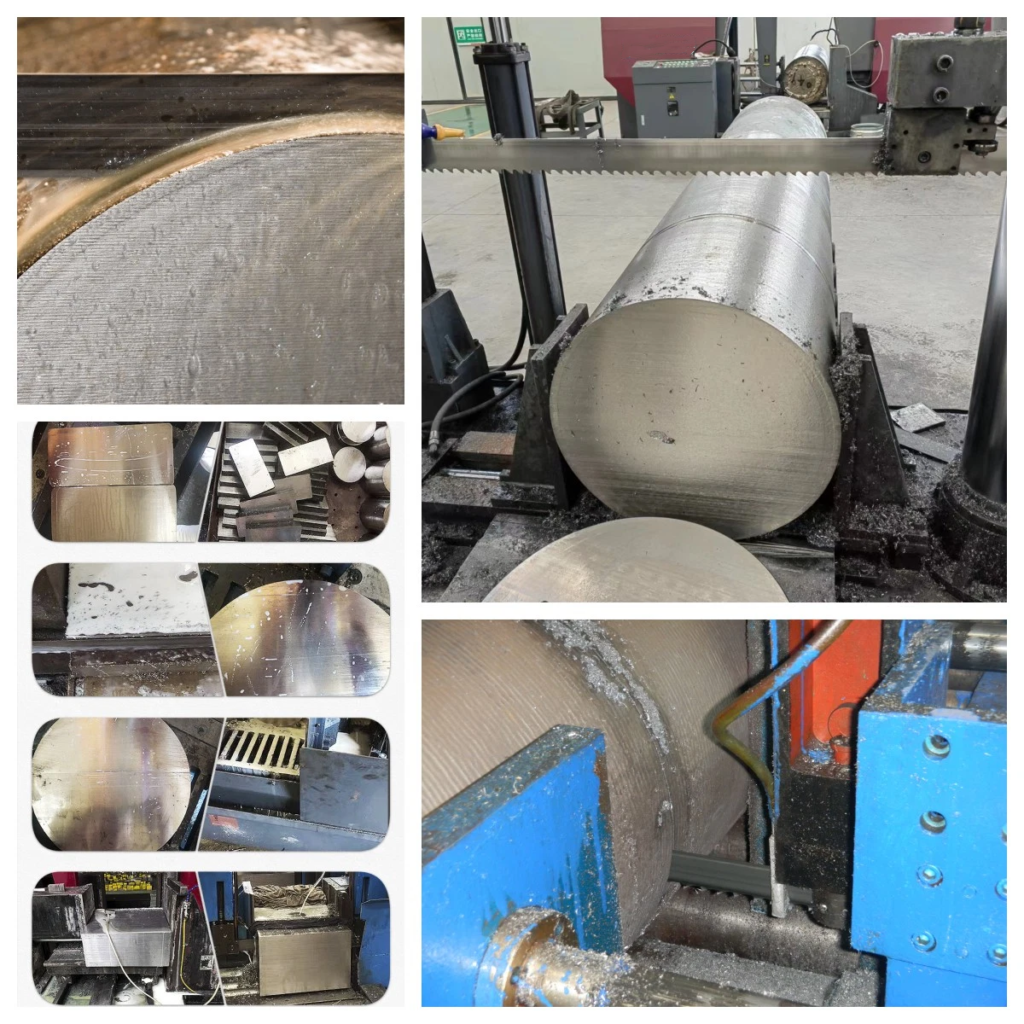
What Should You Look For When Inspecting the Band Saw Blade Itself?
You think your blade is fine until it suddenly snaps or starts cutting crooked. Not inspecting the blade itself is a gamble you cannot afford to take during a big job.
Check the blade for visual signs of trouble. Look for missing or chipped teeth, small stress cracks along the back edge, and any signs of bluing or discoloration. Discoloration is a key sign of overheating. Also, quickly check the blade tension.

The band saw blade is the tool doing the actual work. The rest of the machine is just there to support it. So, a quick look at the blade can tell you a lot about the health of your entire cutting process. I make it a habit to run my gloved hand carefully over a section of teeth (with the machine off, of course). You can feel a chipped tooth or a dull spot easily. Finding a small problem during an inspection prevents a big failure during a cut. It avoids scrapping expensive material and losing valuable production time.
Decoding Blade Wear and Tear
Each sign of wear tells a story about what is happening during the cut. Learning to read these signs helps you fix problems before they get worse.
| Visual Sign | Probable Cause | What to Do Next |
|---|---|---|
| Chipped/Missing Teeth | Feed rate is too high; vibration in the workpiece or machine. | Adjust cutting parameters; check that the material is clamped securely. |
| Cracks on Back Edge | Blade tension is too high; blade guides2 are worn or misaligned. | Check tension with a gauge; inspect the condition of guide bearings. |
| Discoloration (Blue) | Overheating from lack of coolant or the blade speed is too fast. | Check coolant flow at the cut; reduce blade speed for the material. |
| Uneven Tooth Wear | Blade guides are misaligned, causing the blade to twist in the cut. | Re-align blade guides carefully so they support, but don't pinch, the blade. |
Another critical point is blade tension3. If the blade is too loose, it will wander and make a crooked cut. If it is too tight, it puts huge stress on the blade, the welds, and the wheel bearings. This is a common cause of premature blade breakage and bearing failure. Use a tension gauge to set it correctly based on the blade width and manufacturer's recommendation. It takes seconds but saves blades.
What Other Parts of the Band Saw Need a Weekly Check?
You have greased the saw and cleaned the tank. But what about the parts that hold everything together and keep the operator safe? Ignoring them can lead to inefficiency and dangerous failures.
Beyond lubrication and coolant, do a quick safety and stability check. Make sure all safety guards are in place and working. Check the blade tracking on the wheels. Also, listen for any unusual noises like grinding or squealing during operation.
This final part of the weekly check is about awareness. It is about looking and listening to the machine. A machine will almost always give you a warning before a major failure. A new vibration, a strange noise, a guard that is loose—these are all signs. I once had an operator tell me about a new "squeaking" sound. We investigated and found a drive belt was frayed and about to snap. Finding it during a check prevented a sudden stop in the middle of a rush order. This awareness is a key part of a good maintenance culture.
Your Weekly Safety and Performance Checklist
This is not about a deep disassembly. It is a quick walk-around to spot developing issues. You are looking for anything that has changed from last week.
| Weekly Check Item | Status | Notes / Action Needed |
|---|---|---|
| Safety Guards in Place | Are they secure and functional? | |
| Blade Tracking on Wheels | Is the blade centered on both wheels? | |
| Condition of Blade Guides | Are the bearings spinning freely? Any chips? | |
| No Unusual Noises/Vibrations | Listen to the saw run for 10 seconds. | |
| Coolant Flow is Strong | Are both nozzles clear and aimed at the cut? | |
| Drive Belt Tension/Condition | Visually inspect for cracks or fraying. |
This whole process—lubrication, cleaning, and the final machine check—might take 30 minutes when you first start. Once it becomes a routine, you can do it in 15 minutes. Those 15 minutes will pay you back with hours of reliable uptime, longer blade life, and safer operation. It is one of the smartest investments of time you can make in your workshop.
Conclusion
This weekly routine of lubrication, cleaning, and inspection is simple. It will extend blade life, prevent breakdowns, and save you money. It's a small investment with a big return.